Secure Onboarding: Register Users For Self-Service Password Reset with PowerShell
During a recent webinar, I showed how new hires can logon the first time without needing an initial password from their manager. By pre-registering email and mobile phone authentication methods, users can log on to Microsoft 365 by entering their email address (userPrincipalName) and reset their account’s password. I presented some PowerShell samples which are duplicated below with some explanatory comments.
Before we dive into the PowerShell example, let’s make sure you have registered an application for Microsoft Graph. If you already have one, you can skip ahead to accessing your application.
Microsoft Graph App Registration
Azure requires multi-factor authentication. Logging on interactively requires the ability to respond to an MFA prompt after entering a username and password. This presents a problem for applications that have no native ability to respond to an MFA prompt.
To facilitate authentication and authorization, applications need to be registered in your tenant. An app registration is a way to enable applications to access your tenant and assign permissions accordingly. By registering an application, you establish a trust relationship with the service principal associated with the registered application.
To create an app registration, go to your tenant’s Azure Active Directory and select App registrations from the left navigation bar. By default, you will see a list of applications where you are the owner. Select the All applications tab to see all applications registered in your tenant. You can check the Deleted applications tab to show deleted applications that can be restored.
If an application for Microsoft Graph has already been registered by someone else, you can consider using it. However, that owner may one day delete the application without notifying you so it might be a good idea to create your own and identify yourself as the owner. In that case, instead of naming it the generic “Microsoft Graph,” call it “Microsoft Graph (your name or function).” The default supported account type, “Accounts in this organizational directory…” is all we’ll need. The Redirect URI (optional) can be let blank. Click the ‘Register’ button at the bottom of the blade.

This will bring you to the Overview blade of your new application. Click the Client credentials link.
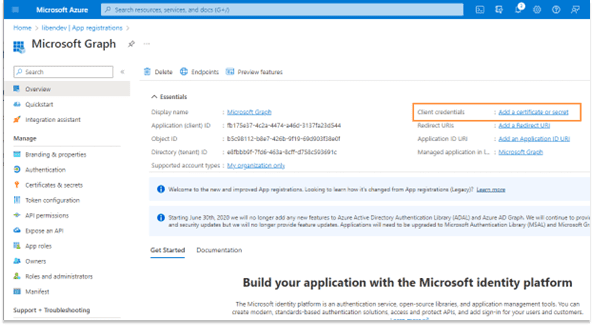
Create a new client secret and give it a meaningful description. You should set an appropriate duration for the credential. The pop-up restricts you to a maximum of two years. If a longer duration is required, a new credential can be created via PowerShell using the New-AzureADApplicationPasswordCredential command in the Azure AD PowerShell module. Be sure to copy the secret’s value as this is the only time it will be displayed.
You can create additional client secrets if you make a mistake or need to create a new one when one expires. The client secret’s expiration time is always displayed in the console. You will need to come up with your own reporting method to track client secret expiration. You may also choose to register a certificate for authentication if you have a PKI to centralize reporting of expirations. A self-signed certificate can be used but provides little additional value.
The application (client) ID and Directory (tenant) ID are available. They need to be included in our PowerShell script. You can use a fully qualified DNS name instead of the tenant ID Guid.
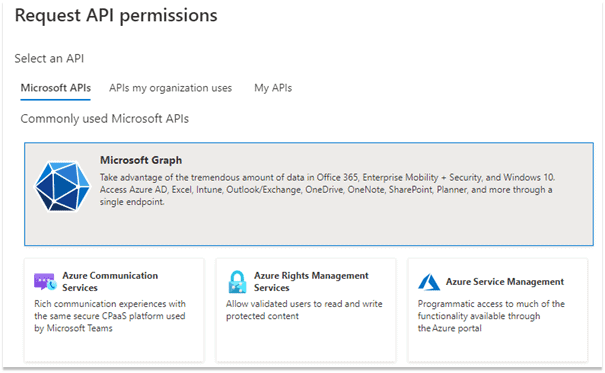
The application needs to be granted required permissions in your directory. In the illustration, User.Read has already been granted in my tenant. We will need to add separate permissions to read and write Authentication Methods. Select the Add a permission link.

In my tenant, a link to Microsoft Graph comes up under Commonly used Microsoft APIs. You may need to search for a link for your application. Click the link.
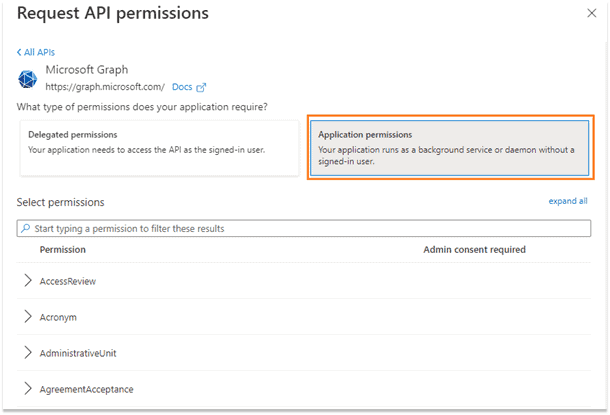
In the pop-up menu for Request API permissions, we are seeking to grant Application permissions so click the appropriate link. A long list of permission types will appear.
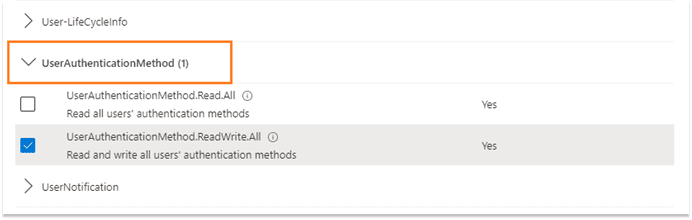
Scroll down to UserAuthenticationMethod and expand the list. Select UserAuthenticationMethod.ReadWrite.All since we will be writing new values. If your application is only retrieving data, UserAuthenticationMethod.Read.All is appropriate.
You will find that the application hasn’t been granted permissions; they have only requested them. This is visible in the Status column of Configured permissions. A separate step is needed to consent. Click the Grant admin consent for <tenant> link.
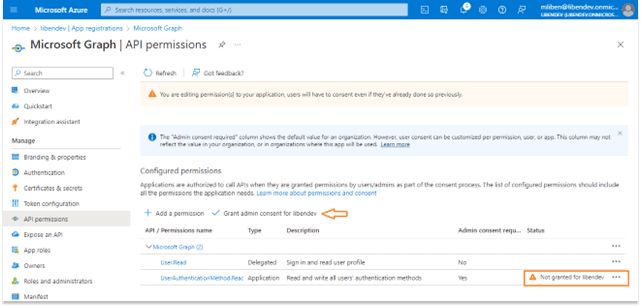
A “Grant admin consent confirmation” pop-up will appear. Click Yes to grant admin consent. You must be a global admin or a role with required permissions to grant consent.

When completed, you will see that permission to read and write User.AuthenticaitonMethod has been granted.

Accessing Your Application
The example assumes you have registered an Azure Application for Microsoft Graph, have created client credentials, and generated a client secret. These should run on PowerShell 5.x or later.
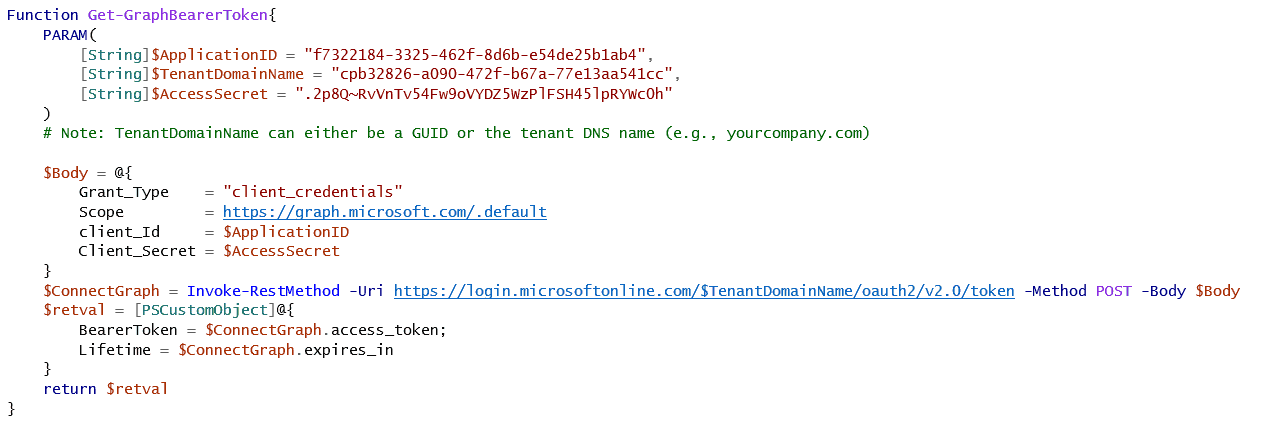 The Get-GraphBearerToken function takes an Application ID, a tenant name, and a client secret and connects to Microsoft Graph using the PowerShell Invoke-RestMethod command. The parameters have been given default values for illustration purposes. You will likely call this function by supplying the parameters:
![]()
Be sure to get the return value as you will need it for subsequent calls. The function returns a custom object with two attributes, BearerToken and Lifetime. The lifetime value is useful in determining how long the token is valid before exchanging it for a refresh token during longer operations. By default, Azure bearer tokens has a lifetime of 60 minutes. The Lifetime value is a number in seconds (e.g., 3600). If you’re setting values on a single user or handful of users, the lifetime can be ignored.

The GetGraphAuthenticationMethod_EmailUri function takes a user ID–which can be either an objectID Guid or a userPrincipalName–and constructs an endpoint Uri for the user. The “{0}” is replaced with the $userId value and the final Uri will be https://graph.microsoft.com/beta/users/ahayward@libendev.onmicrosoft.com/authentication/emailMethods for user ahayward in my test domain, libendev.onmicrosoft.com. You can create similar functions for different endpoints, such as phone methods which I’ll cover in a future post.
Putting it all together:

We begin with a call to connect to Azure and get an access (bearer) token. We next construct a user-specific Uri as a rest endpoint. Next, we call the user-specific Rest endpoint (Uri) with our bearer token and specify a Get method.
This returns an object, $email, that contains two attributes: an @odata.context and a value, the latter being an object. The @odata.context contains a slightly modified version of the Uri we supplied, such as: https://graph.microsoft.com/beta/$metadata#users(‘myusername%40mydomain.com’)/authentication/emailMethods
We check the returned object to see if there are any values. If the value count is 0 then the user doesn’t have an email address registered. If the count is greater than 0, the user already has an email method registered. I recommend against replacing an address that may be in use without first consulting the user.
When the value is present, it has two attributes: id, which is the Azure objectId of the user, and the emailAddress.
Now that we’ve read the email address, let’s look at how we can set one on the user. We’ll need to place the new values in the body of the REST call. The PowerShell way is to create a hash of the attribute and its value and convert it to the Jason object required by http Put methods.

We can reuse the prior Uri, change the method to Put instead of Get, and add the json value in a Body parameter.

In my next post (coming soon), we’ll explore setting other Authentication Methods including mobile phone.
Learn more about secure onboarding from our webinar, “3 Passwordless Ways to Securely Onboard New Users.”