Use Data Masking to Securely Track and Organize Client Listings, Vendor Listings, and Projects in SharePoint and Teams
This is Part 4 of our ‘Getting the Most Out of Your Microsoft 365 Licensing’ blog series. This blog series is intended for Small and Medium sized businesses (SMB) with Microsoft 365 E3/A3 or E5/A5 licensing to help you cut costs and maximize on the investments your organization has already made.
Within this five-part blog series we will be exploring:
- Building an Internal IT Helpdesk Request System
- Building a Change Management Request System
- Building an Asset Tracking System
- Securely Track and Organize your Client/Vendor Listing
- Organize your Documentation Across Multiple Compliance Frameworks
Part 4: Securely Track and Organize your Client and Vendor Listing
By using Microsoft 365 to create custom IDs for your clients, vendors, employees, etc., you can use data masking to help protect sensitive information. There are several third-party solutions that can also be used, but these third-party solutions may need special connectors for Microsoft 365 solutions that may come with an additional cost. With the licensing you already have you can create custom IDs to help you build a tracking system that will meet your needs.
Sensitive information does not always need to refer to PII but can help protect client names from other clients. For example, if you already have complex external collaboration within your SharePoint/Teams structure, you may have a Teams project site with multiple channels using a client or project’s name. If you cannot use private channels then all external members of the site can see all the channels, revealing information they don’t necessarily need to know.
In this part of our blog series, we will be building custom Client IDs, custom Project IDs, and building out Teams sites and channels. We will also be using some of the other solutions we have built in previous parts of this series.
In this blog we will be utilizing:
- Microsoft Teams
- SharePoint Online
- Power Automate Flow
Step 1: Create Your Teams Site
If you do not already have a Teams site, you will need to create one for your lists. Since this may be tied to sensitive information, you will want to make sure the site is secured so only those that need to know have access. Remember, site owners cannot be locked out.
In this example we will be creating a “Business Operations” site, with an “Identifiers” private channel within it.
- Within Teams, select “Teams” in the left navigation bar.
- At the top of the “Teams” pane click the +, select “Join or Create a Team.”
- Click “Create team.”
- Select your template, in this example we will select “From scratch.”
- Select your Sensitivity label and Privacy setting we will be using the “Private” setting.
- Sensitivity labels are part of Microsoft Purview and must be enabled for SharePoint/Teams sites.
- Name your Team and give it a description. Click Create.
- We will be skipping adding members to your Team until we get the structure and automation built.
- Click the … next to your team and select “Add channel.”
- Add your “Channel name,” “Descriptions,” and select “Private” for the “Privacy” setting. Click Create. Skip adding members for now.
Step 2: Create your SharePoint Client List
If you have not already set up your external sharing settings, it is recommended that you review your settings at a higher level. We will be reviewing this in future blogs.
- Navigate to the “Business Operations – Identifiers” SharePoint site.
- Within your SharePoint site, select + New then select List.
- Select your Template, in this example we will be using the Blank
- Microsoft provides templates for several scenarios including Issue Tracking. In some scenarios those lists may be detailed with columns that may not be relevant to your organization.
- Give your list a distinct name and description. In this example we will be using “ClientID”, click Create.
- Now we will want to modify the list to suit our needs. Select the ⚙ in the upper right corner, select List settings.
- Add/Modify the columns to match your design.
The above example is a very basic list and can be customized and built out based on organizational needs. There are several things that you can do to customize and meet the majority of SMBs organizational needs.
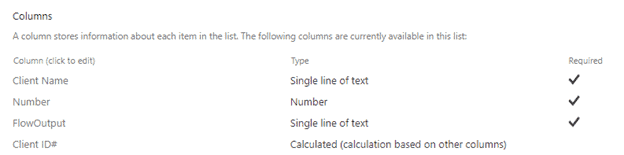
Here’s what I did to capture client names for client ID generation:
- Renamed the required “Title” column to “Client Name” to show what the client’s name is.
- Created the required “Number” column as a number column that will be the starting number used within Flow to create the client ID.
- I will be using a 101 minimum and default value, with no decimal places.
- I will not be adding to the default view.
- Created the required “FlowOutput” as a single line of text column, this will be a calculated column within SharePoint to feed the “Client ID#” column, this column has default text value of “Generating ID…”.
- I will not be adding to the default view.
- Created the “Client ID#” as a calculated column based on other columns, the formula is =FlowOutput to pull the generated client ID from Flow.
You may desire some more information like whether the client is active, archived, etc.
Step 3: Create Your ClientID Flow
As suggested in Part 1, when first getting started Power Automate and any Power Platform App will direct you to the “Default” Power Platform Environment for your tenant. It is highly recommended to leave the default a clean slate environment and create a new production environment. In some cases you may have the 1GB capacity limits that will not allow you to create a new environment. If possible, further lock down your environment so users cannot misuse production.
Currently, Flow does not support Service Principles or Managed Identities. You can use a Service Account, which will require access and licensing for all connectors you use. Alternatively, it is recommended to share your flow with additional staff and give them co-owner rights as a backup. Verify there is a Change Management Approval in place for any modifications to Flows within your production environment.
For this example, we will be creating a “When an item is created” SharePoint trigger, I recommend utilizing renaming and notes on your flows. The renaming alone will help to easily identify the correct dynamic content when repeated steps are used within conditions.
First, open Power Automate (Power Automate can be found via the Office Portal, select All Apps if it is not on your menu). Select the correct “Environment.” Select +New flow, select “Automated cloud flow.”
- Name your flow, select “when an item is created” SharePoint trigger.
- Click Create.
- Select the “When an item is created“ card to open the properties in the new Copilot view.
- Since CoPilot may not be enabled in all tenants or different than known, you can use the classic designer, click the … in the upper right corner, and select “Switch to classic designer.” Some of the below steps may be a bit different, but the concept is the same.
- At the pop-out blade we will rename the Trigger to “New Client Is Created” (click on current name).
- Select the … next to the << in upper right of the blade to add comments.
- On the “Parameters” options select your “Site Address” and “List Name” to be what you created in Step 1.
- Add an action (by clicking the +, select “Add action”).
- Type “get item” in the search to find the “Get item” SharePoint action.
- Rename the action to “Get Client Info.”
- On the “Parameters” options select your “Site Address” and “List Name” to be what you created in Step 2.
- Use dynamic content to select the Id (lightning symbol). Look for ID under the “New Client is Created” content. This will create a “For each” array.
- Add an action (by clicking the +, select “Add action”) within the array.
- Type “compose” in the search to find the “Data Operation” “Compose” action.
- We will be renaming the “Compose” action to “StartingNumber.”
- On the “Parameters” options use the dynamic content to select “Number” from the “Get Client Info” content.
- Add an action (by clicking the +, select “Add action”) within the array.
- Type “compose” in the search to find the “Data Operation” “Compose” action.
- We will be renaming the “Compose” action to “IDNumber.”
- On the “Parameters” options use dynamic content to select “ID” from the “Get Client Info” content.
- Add an action (by clicking the +, select “Add action”) within the array.
- Type “compose” in the search to find the “Data Operation” “Compose” action.
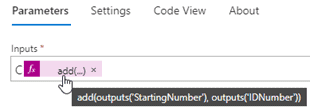
- We will be renaming the “Compose” action to “AddNumber.”
- We will be using an expression to calculate our client ID. In this example I want my client IDs to begin with “C”.
- It is recommended to use some type of prefix to distinguish between clients (C), employees (E), Vendors (V), Suppliers (S), etc. These can be more advanced if needed based upon your business needs.
- On the “Parameters” options type C and add the expression add(outputs(‘StartingNumber’), outputs(‘IDNumber’)).
- We now have our number. Now we need to write it back to our SharePoint list.
- Add an action (by clicking the +, select “Add action”) within the array.
- Type “update item” in the search to find the “Update item” SharePoint action.
- Rename the action to “AddClientID”.
- On the “Parameters” options select your “Site Address”, and “List Name” to be what you created in Step 3.5.
- Use dynamic content to select ID from “Get Client Info” content.
- Use dynamic content to select Client Name from “Get Client Info” content.
- Leave “Number” as default.
- Use dynamic content to select Outputs from “AddNumber” for the “FlowOutput” column.
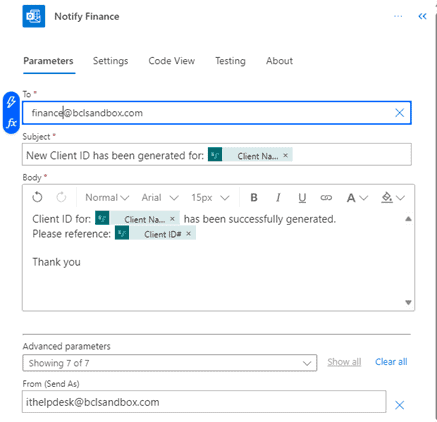
You can go beyond this simple Flow to add notifications to specific staff or departments. In this example we will email the Finance Department of the ID to start creating their records.
- Add an action (by clicking the +, select “Add action”) within the array.
- Type “email” in the search to find the “Office 365 Outlook” “Send an email (V2)” action.
- We will be renaming the “Send an email (V2)” action to “Notify Finance”.
- On the “Parameters” options select your recipients, You can use dynamic content within the subject and body.
- You can use “Advanced parameters” to select From (Send as), Reply to, Sensitivity, etc.
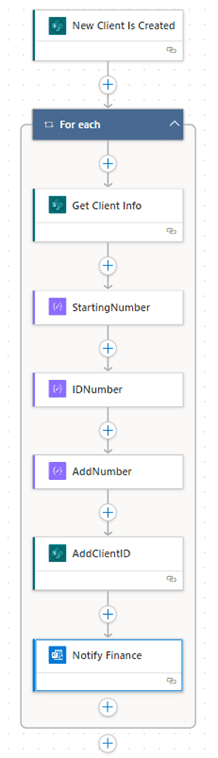
Your final flow using the above will look like this:
Step 4: Create your SharePoint Project List
- Navigate to the “Business Operations – Identifiers” SharePoint site.
- Within your SharePoint site, select + New then select List.
- Select your Template, in this example we will be using the Blank
- Give your list a distinct name and description. In this example we will be using “ProjectIDs.” Click Create.
- Now we will want to modify the list to suit our needs. Select the ⚙ in the upper right corner, select List settings.
- Add/Modify the columns to match your design.
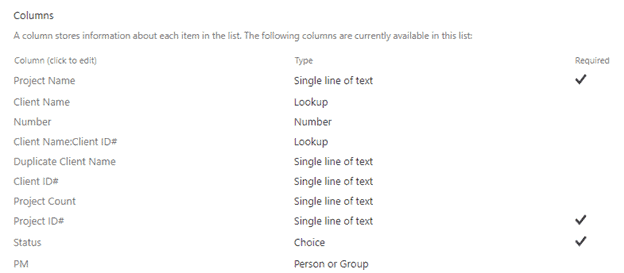
The above example is a very basic list and can be customized and built out based on organizational needs. Here’s what I did to create a simple list to capture project names to generate a unique project ID that is tied to your client IDs:
- Renamed the required “Title” column to “Project Name” to show what the project is.
- Created the “Client Name” lookup column, this column is to pull information from the “Client Identifiers” “Client Name” column.
- We will be adding a column to add the “Client ID#” as an additional field.
- Created the “Number” column as a number column that will be the starting number used within Flow to create the client ID.
- I will be using a 1 minimum value, with no decimal places.
- I will not be adding to the default view.
- Created the “Duplicate Client Name” column as a single line of text, we will be using this within our Flow to write the client to get the count for the unique ProjectID.
- I will not be adding to the default view.
- Created the “Client ID#” column as a single line of text, we will be using this within our Flow to write the client ID for the unique project ID based upon the client.
- I will not be adding to the default view.
- Created the “Project Count” column as a single line of text, we will be using this for counting a filtered value.
- Created the required “Project ID #” column as a single line of text, with a “Generating ID…” default value.
- Created the required “Status” column as a choice, with New, InProgress, Stopped, and Completed and “New” as the default value.
- Created the “PM” column as a person or group, allowing “People Only”.
If you need more information or to lock down the sites so specific people can only update specific columns, this can all be done with these solutions.
Step 5: Create Your ProjectIDs Flow
For this example, we will create a “When an item is created” SharePoint trigger. I recommend utilizing renaming and notes on your flows. The renaming alone helps to easily identify the correct dynamic content when repeated steps are used within conditions.
First, open Power Automate (Power Automate can be found via the Office Portal, select All Apps if it is not on your menu). Select the correct “Environment.”
- +New flow, select “Automated cloud flow”.
- Name your flow. Select “when an item is created” SharePoint trigger.
- Click Create.
- Select the “When an item is created” card to open the properties in the new Copilot view.
- If CoPilot isn’t enabled, you can use the classic designer. Click the … in the upper right corner and select “Switch to classic designer.” Some of the below steps may be a bit different, but the concept is the same.
- At the blade pop-out, rename the Trigger to “New Project Is Created” (click on current name).
- Select the … next to the << in upper right of the blade to add comments.
- On the “Parameters” options select your “Site Address” and “List Name” to be what you created in Step 4.
- Add an action (by clicking the +, select “Add action”).
- Type “get item” in the search to find the “Get item” SharePoint action.
- Rename the action to “Get Project Info.”
- On the “Parameters” options select your “Site Address” and “List Name” to be what you created in Step 5.6.
- Use dynamic content to select the Id (lightning symbol). Look for ID under the “New Client is Created” content.
- This will create a “For each” array, drag the card out of the array, delete the array.
- Add an action (by clicking the +, select “Add action”).
- Type “update item” in the search to find the “SharePoint” “Update item” action.
- Rename action to “Update Project Info.”
- On the “Parameters” options use dynamic content to get below fields from the “Get Project Info” content. (You will need to expand “Advanced parameters.”
- Id = ID
- Project Name = Project Name
- Number = Number
- Duplicate Client Name = Client Name Value
- Client ID# = Client Name:Client ID# Value
- Add an action (by clicking the +, select “Add action”).
- Type “get items” in the search to find the “Get items” SharePoint action.
- Rename the action to “Refresh Projects by Client Name.”
- On the “Parameters” options select your “Site Address” and “List Name” to be what you created in Step 5.6.
- Expand the “Advanced parameters” and create a “Filter Query.”
- We will be creating a “Duplicate_x0020_Client_x0020_Nam eq ‘Duplicate_x0020_Client_x0020_Nam’ (Second Duplicate_x0020_Client_x0020_Nam Value is dynamic content (within the quotation)).
- There is no “e” due to character limitations.
- As mentioned in the video, if the filter column may contain special characters, you will want to use a different column like the “Client ID#” that has a unique ID with no special characters, or more complex filter arrays will need to be added to your flow.
- Add an action (by clicking the +, select “Add action”).
- Type “initialize variable” in the search to find the “Variable”, “Initialize variable” action.
- We will be renaming the “Initialize variable” action to “Count Client Instances.”
- On the “Parameters” options name will be “Record Count”, string type, value is length(outputs(Refresh_Project_by_Client)?[‘body/value’]).

- Add an action (by clicking the +, select “Add action”).
- Type “update item” in the search to find the “SharePoint”, “Update item” action.
- Rename action to “Add Project Count.”
- On the “Parameters” options select your “Site Address”, and “List Name” to be what you created in Step 5.6. Use dynamic content to get below fields from the “Update Project Info” content. (You will need to expand “Advanced parameters”. (This will create a “For each” array, move the card up out of the array, delete array.)
- Id = ID
- Project Name = Project Name
- Project Count = Record Count (variable output)
- Add an action (by clicking the +, select “Add action”).
- Type “get item” in the search to find the “Get item” SharePoint action.
- Rename the action to “Refresh Project by Count.”
- On the “Parameters” options select your “Site Address”, and “List Name” to be what you created in Step 5.6. Use dynamic content to add the Id from the “Add Project Count” content.
- Add an action (by clicking the +, select “Add action”).
- Type “update item” in the search to find the “SharePoint”, “Update item” action.
- Rename action to “Add ProjectID.”
- On the “Parameters” options select your “Site Address” and “List Name” to be what you created in Step 5.6. Use dynamic content to get below fields from the “Refresh Project Info” content. (You will need to expand “Advanced parameters”).
- Id = ID
- Project Name = Project Name
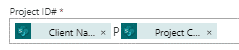
- Project ID# = Client Name:Client ID# Value “P” Project Count.
- Add an action (by clicking the +, select “Add action”).
- Type “get item” in the search to find the “SharePoint”, “Get item.”
- Rename action to “Final Refresh”.
- On the “Parameters” options select your “Site Address”, and “List Name” to be what you created in Step 5.6. Use dynamic content to get the Id from the “Add ProjectID” content.
In this example we will email Project Management of the new Project and ProjectID to assign a Project Manager.
- Add an action (by clicking the +, select “Add action”) within the array.
- Type “send email” in the search to find the “Office 365 Outlook” “Send an email (V2)” action.
- We will be renaming the “Send an email (V2)” action to “Notify Project Management.”
- On the “Parameters” options select your recipients, you can use dynamic content within the subject and body.
- You can use “Advanced parameters” to select From (Send as), Reply to, Sensitivity, etc.
Your final flow will look like this:

Step 6: Pin SharePoint List to Teams (Optional) & Add Members
To easily access the Client and Project IDs and to allow users to have a reference lookup to those who need to know, we will pin the list to the Business Operations, Identifiers Channel. Most staff stay logged into Teams throughout the day, so they have one application to manage the assets. If you want certain people to view and not modify the list items, then depending on business needs restrictions may need to be implemented. In future blogs we will explore securing your SharePoint lists and allowing certain updates to be done by certain people.
- Select the + to add a new Tab to Business Operations, Identifiers Channel.
- In this example we will be pinning both the “ClientID” and “ProjectIDs” Lists to the team channel.
- The default view will display.
- Add members to your Teams site and private channel.
Step 7: Putting It Together
To summarize:
- Data masking can help conceal sensitive information.
- Creating unique identifiers for employees, vendors, clients, etc. can help properly categorize and organize your data.
- You can lower budgetary expenses by using tools you already invest in.
Final Thoughts
Using Microsoft 365, you can build solutions to meet all your organizational needs without purchasing additional third-party solutions. The above is just one example of how to utilize data masking for sensitive information types. There are several ways to achieve desired outcomes using these solutions. Watch for more blogs coming in 2024 that will build off the solutions we have created in this series.