Building an Internal IT Helpdesk with Microsoft 365
This is Part 1 of our ‘Getting the Most Out of Your Microsoft 365 Licensing’ blog series. Look for a new installment every month.
This blog series is intended for Small and Medium sized businesses (SMB) with Microsoft 365 E3/A3 or E5/A5 licensing to help you cut costs and maximize on the investments your organization has already made.
Within this five-part blog series we will be exploring:
- Building an Internal IT Helpdesk Request System
- Building a Change Management Request System
- Building an Asset Tracking System
- Track and Organize your Client/Vendor Listing
- Organize your Documentation Across Multiple Compliance Frameworks
Part 1: Building an Internal IT Helpdesk
With an internal help desk, you can centralize and streamline requests and tickets to free up time that could be spent working on more complicated issues.
In this blog we will be utilizing:
- Exchange Online
- SharePoint Online
- Power Automate Flow
- Microsoft Forms
- Microsoft Teams
Step 1: Create Your SharePoint List
If you do not already have an IT SharePoint site, you will need to create one for your SharePoint list.
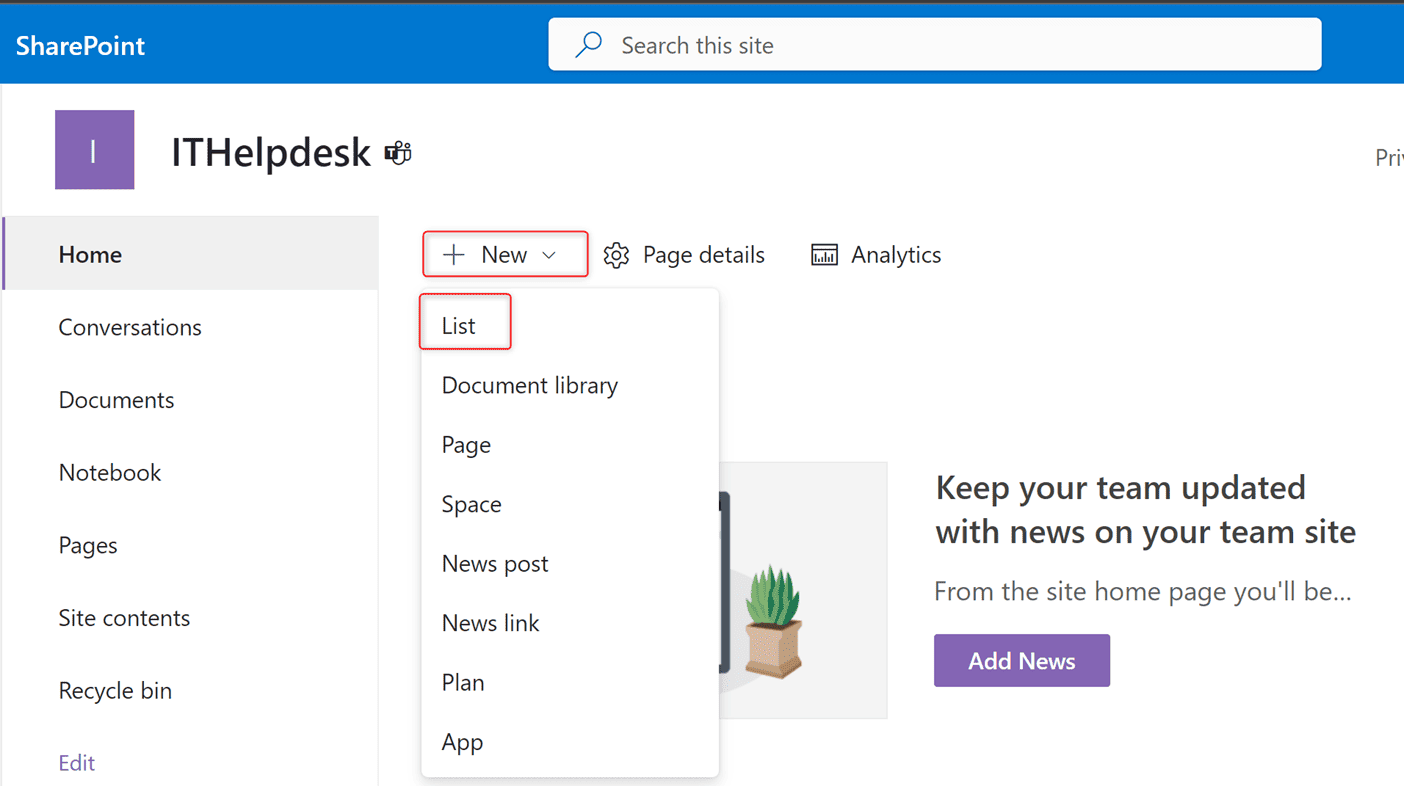
- Within your SharePoint site, select + New then select List.
- Select your Template, in this example we will be using the Blank template.
- Note: Microsoft provides templates for several scenarios including Issue Tracking. In some scenarios those lists may be detailed with columns that may not be pertinent to your organization.
- Give your list a distinct name and description, click Create.
- Now we will want to modify the list to suit your needs. Select the ⚙ in the upper right corner, and select List settings.
- Add/Modify the columns to match your design.
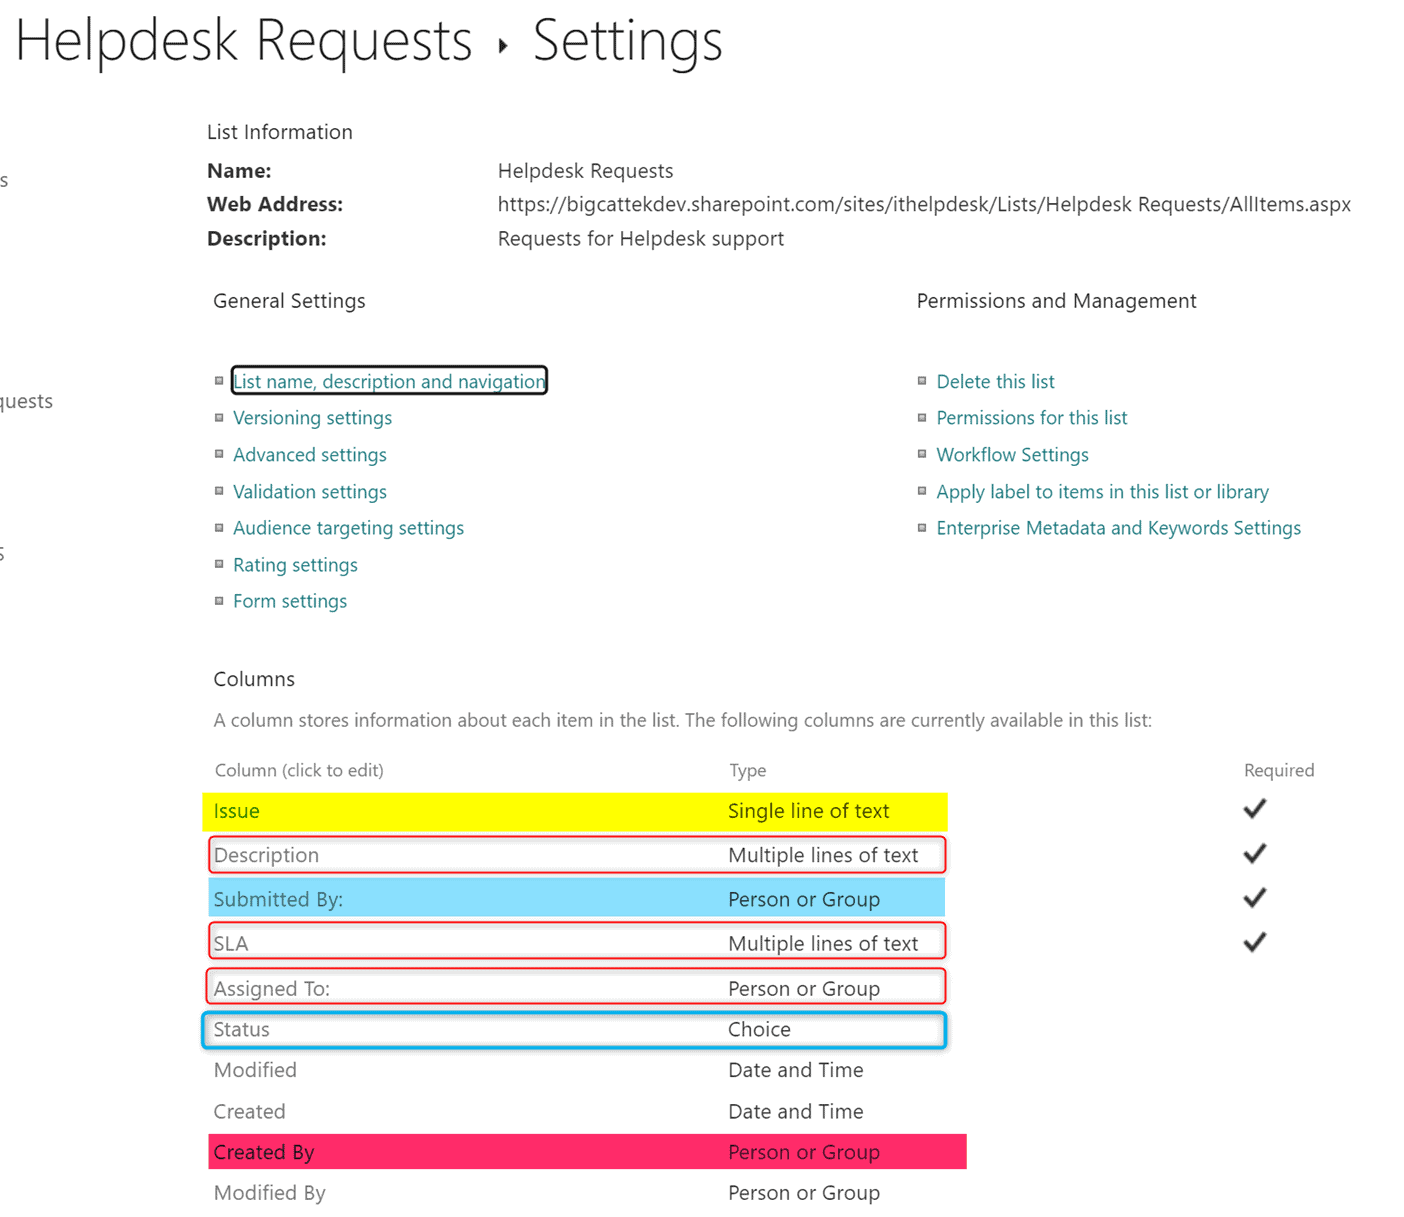
The above example is a very basic list and can be customized and built out based on organizational needs. There are several things we can do to customize and meet the majority of SMBs organizational needs. For example, do you need a custom number for your requests? Do you want users to submit screenshots? That can all be done with these solutions.
- In this example we have renamed the required “Title” column to “Issue” to show the short description on the request.
- The “Description” column is required and will allow for more text so users can go into detail of the request.
- We also created the “Submitted By:” column to be required. This column is different than the “Created By:” column because Power Automate Flow will create the list item based on who the flow runs as and not who submitted it.
- The “Assigned To:” column is not required so that requests can be reviewed prior to assigned. If it is required, Power Automate Flow will need a value at time of creation.
- The “Status” column is not required and is a choice column to select the “New”, “InProgress”, “Completed” and “Rejected” status to track the request lifecycle.
- The last required column created was the SLA, this will allow for the user to attest to the level of need during ticket submission.
Optional Step: Customize your view
Within your SharePoint List select the All Items drop down and select Create new view or using List Settings.
- In this example, I want to filter my view, so I’m going to create my view within the list settings.
- Select the ⚙ in upper right corner, select List Settings.
- I’m going to create a new view called “Open Requests” filtered to exclude “Status” does not contain “Completed” and “Status” does not contain “Rejected”.
- I will be using the “Gallery” view.
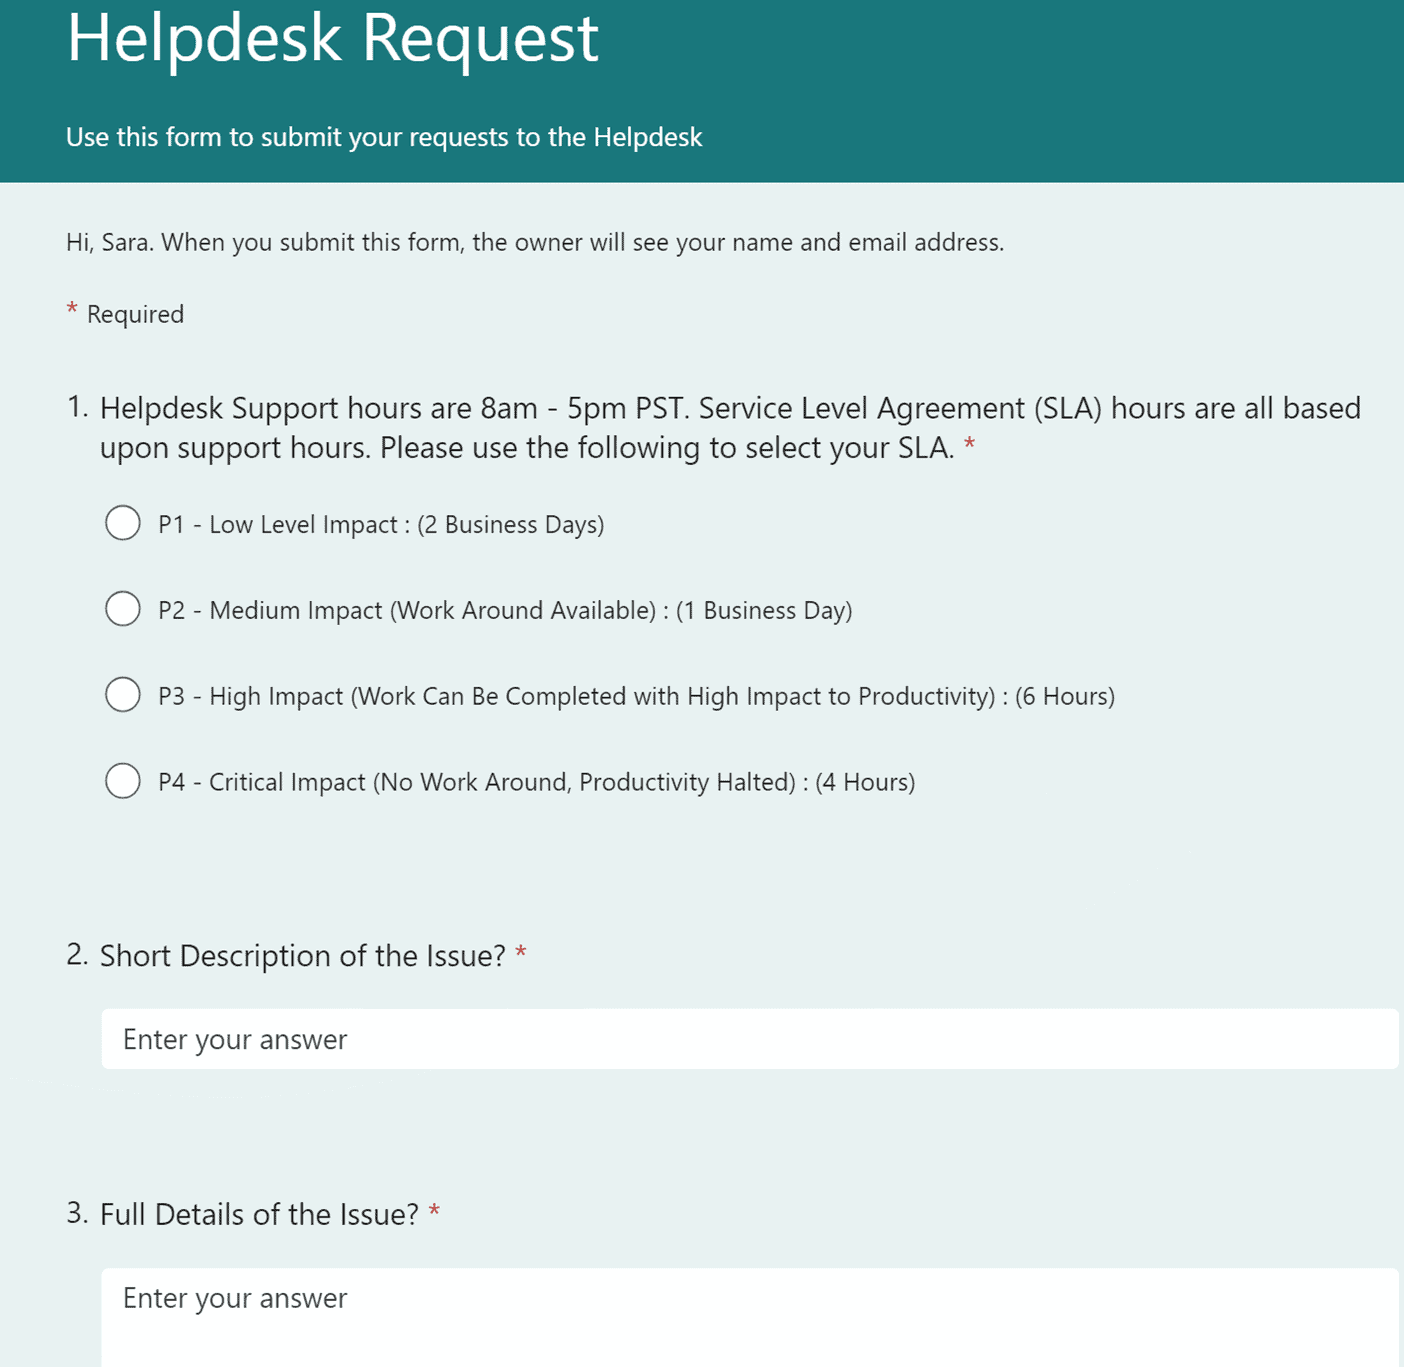
Step 2: Create Your Microsoft Form
This is a simple example that provides the requestors with the Support Hours and the SLA options.
- Open Microsoft Forms, create a new Form. (Microsoft Forms can be found via the Office Portal, select All Apps if it is not on your menu).
- Verify your response settings.
- Copy the URL Link to be used later.
Step 3: Create a Shared Mailbox (Optional)
In this step we will be creating a “No-reply” shared mailbox. Shared Mailboxes under 50 GB can be used without a license. This shared mailbox will be used to notify users of successful submission. You can also use an existing Shared Mailbox.
- In the Exchange Admin Center, under Recipients, select Mailboxes, then select Shared Mailbox.
- Select a Display Name and Email Address, click Create.
- Modify the Shared Mailbox.
- Close the “Shared mailbox created successfully” screen. We will be doing some additional modifications to the shared mailbox.
- Hide the Global Address List (GAL).
- Search for the newly created Shared Mailbox, open the mailbox properties. Select the Hide from GAL option.
- Turn the toggle to ON and click Save.
- Send As Rights
- On the “Delegation” tab select the users that need to have SendAs rights, you will need to add any users or service accounts that the Power Automate Flow will be using.
- Confirm your delegation members.
- Set Mailbox Mail Flow Settings
About Mailbox Mail Flow Settings
In this example, I want to prevent users from outside the organization and limit as many senders from replying as possible. We can do this with an Exchange Mail Flow rules or it can be done at the Shared Mailbox level (Shared Mailbox level has more limitations). Select Mailbox and Message Delivery Restrictions.
I’m also going to block anyone from sending to this address if they are outside the company and are not me. Optionally, you can skip the “Message Delivery Restrictions” and just set an Automatic Reply found in the Others.
NOTE: Automatic Replies will still generate mail collection and will increase your mailbox storage (remember the 50GB limit for Shared Mailboxes without licenses), regular maintenance should be done to stay within your storage size.
Step 4: Create Your Power Automate Flow
When first getting started, Power Automate and any Power Platform App will direct you to the “Default” Power Platform Environment for your tenant. It is highly recommended to leave the default a clean slate environment and create a new production environment. In some cases you may have the 1GB capacity limits that will not allow you to create a new environment. It is suggested to further lock down your environment so users cannot misuse production.
Currently, Flow does not support Service Principles or Managed Identities. You can use a Service Account, which will require access and licensing for all connectors you use. Alternatively, it is recommended to share your flow with additional staff and give them a co-owner right as a backup. Verify there is a Change Management Approval in play for any modifications to Flows within your production environment.
First, Open Power Automate (Power Automate can be found via the Office Portal, select All Apps if it is not on your menu). Select the correct “Environment.”
- Create a new flow by clicking + Create.
- Select Automated cloud flow.
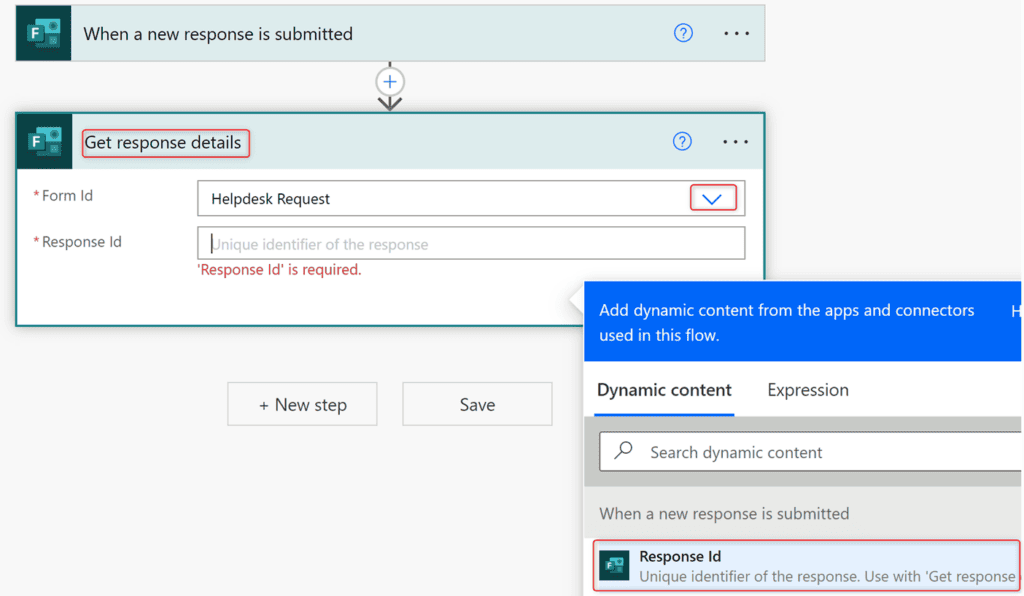
- Create a “Helpdesk Request Submission” to be triggered by Microsoft Forms: When a new response is submitted from the Form Submission. Click Create.
- Power Automate Flow has several built in “dynamic” content to be used. Using the dropdown we see that our “Helpdesk Request” form is visible to use for the “Form Id”. Select the Helpdesk Request and click + New step.
- We will need to get the details of the Form in order to input it into SharePoint. Dynamic content will be extremely useful here. Use the Get response details Forms action. The “Form Id” will be the Form name. The “Response Id” can use dynamic content.
- Please pay close attention to the section that the dynamic content is under. This is going to help you with more advanced flows. In this circumstance the “Response Id” is under “When a new response is submitted” section.
- Please pay close attention to the section that the dynamic content is under. This is going to help you with more advanced flows. In this circumstance the “Response Id” is under “When a new response is submitted” section.
- Now we will tell it to Create item SharePoint action. Click + New step.
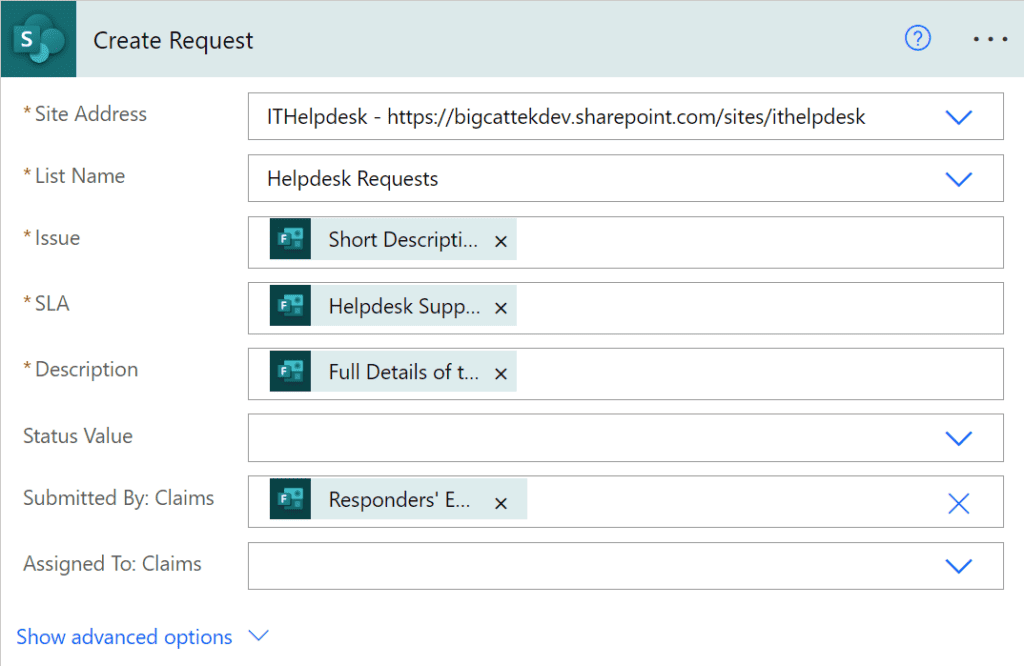
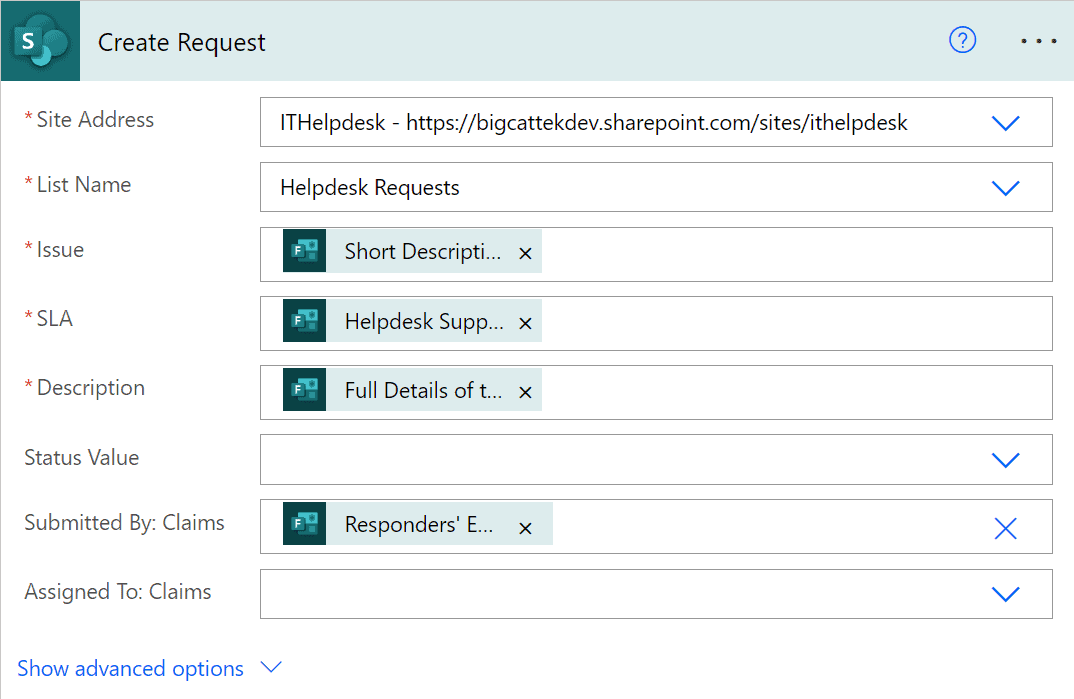
- Create Helpdesk Request by using the drop down menu to select your Site Address and the List Name. Notice the asterisk – remember these are the “Required” columns in your SharePoint List and have to have a value set.
- Using dynamic content, we will be supplying the answers coming from the Form Response. Fill in the three required columns.
- For “Issue” we will be using the “Short Description of the Issue?”
- For “Description” we will be using the “Full Details of the Issue?”.
- For the “SLA” we will be using the “Helpdesk Support hours”.
- For the “Submitted By” we will need to tell it we a entering custom values in order for the dynamic content to be displayed.
- Now we can use the dynamic content to select “Responders Email” for the “Submittd By: Claims”.
- Get SharePoint Item List Information.
- Since the SharePoint List Item was just created, we do not have full details on the columns. We now must receive the details. Click the + New step
- Select Get Item SharePoint action. Be careful not to select the “Get Items”. Fill in the information like previously.

Send User Notification
Let’s now create a new email to send to the end user to let them know their request was submitted successfully.
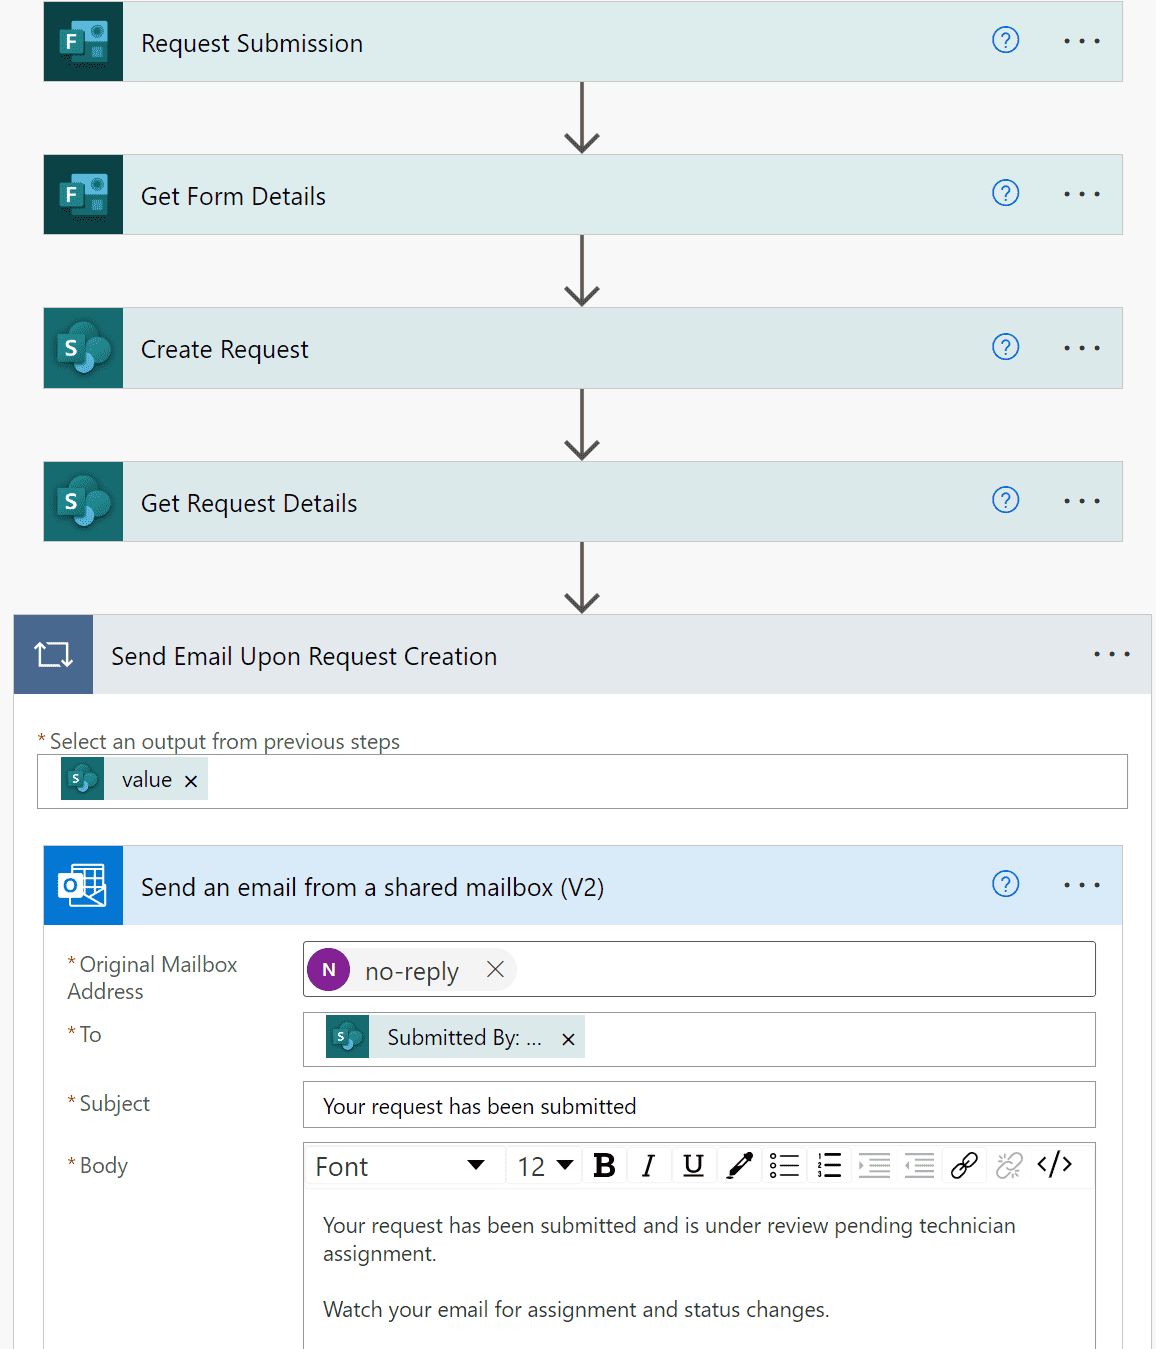
- Click the + New step, select the Send an email from a shared mailbox (V2) This will create an “Apply to each” section.
- You will want to display your advance options in order to add a reply to email address, this will prevent users from emailing the user the flow is running as. The message body can be as detailed as you wish via HTML, including logos/images, embedded URLs, etc.
- Final Flow will look similar to this (It is best practice when sharing Flows to utilizing the “Rename” and “Notes” sections on the actions to leave detail.
Step 5: Create a MyApps Tile
- In the M365 Admin Center, under Settings, select Org Settings.
- On the Organization Profile tab, select Custom Tiles for Apps.
- Select Add Custom Tile.
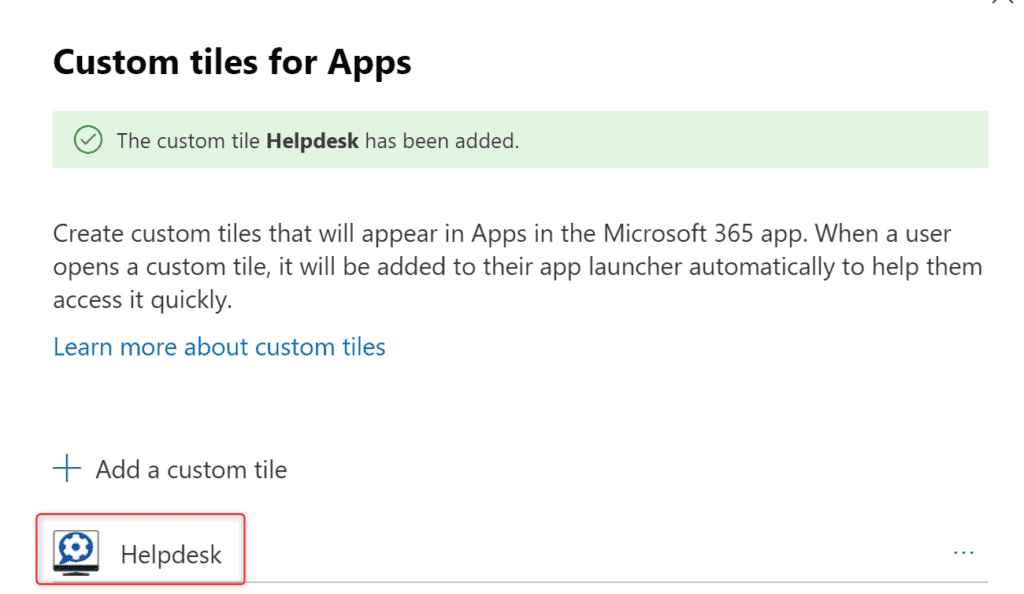
- Add your Tile name, URL of website (copied from the Forms link earlier), URL of tile image (IMPORTANT: You’re allowed a 60×60 pixel tile the tile has to be published where all users can view.), and description. Click Save.
- You should have a message that your App Tile is now saved. The App Tile can take up to 24 hours to display in the MyApps portal.
- Users should be instructed that the new tile will appear in their MyApps portal, if not visible via the App Launcher, they will have to click the “Explore all your Apps” and look for the “Admin Selected” apps section.

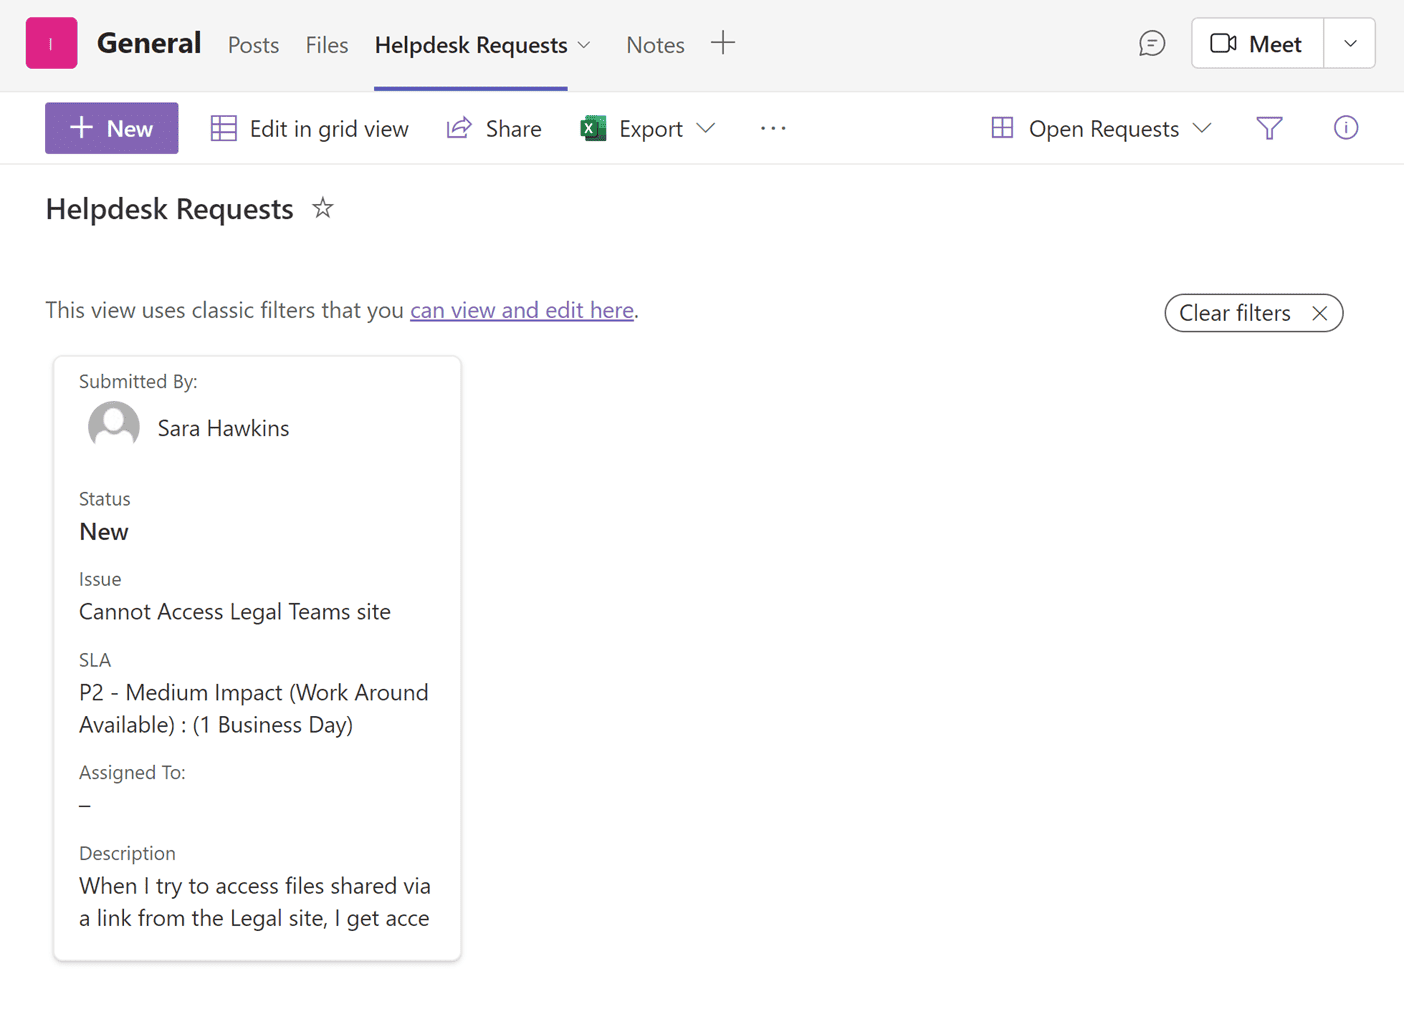
Step 6: Pin SharePoint List to Teams (Optional)
In order to easily access the Helpdesk Requests, we will pin the list to Teams Channel. Most staff stay logged into Teams throughout the day, so they have one application to manage.
- In Microsoft Teams Select the + to add a new Tab at the top of a channel.
- In this example we will be Pinning the Helpdesk Requests to the IT Helpdesk General Channel.
- Select the location and the list you want to add.
- You can now get to the Helpdesk Request via Teams and manage your requests within one app.
Step 7: Putting It Together
- Users select Helpdesk Request App Tile from MyApps.
- They submit their request.
- Requests can be managed via the Pinned Tab in Teams.
Conclusion
Your Microsoft 365 license investments can be a valuable tool to help reduce the costs of third-party software. By leveraging your Microsoft investment to build an internal IT help desk, you can simplify and customize processes to your needs. The above examples are just some of the simple workflows that can be implemented – there’s a lot more you can do with your licensing investment. Watch this space for more ideas for leveraging Microsoft 365 to improve security and streamline operations.
Does your organization need assistance with planning and deploying Microsoft 365 capabilities?
We will be happy to discuss the details with you. Contact Us.