Building an IT Asset Tracking System
This is Part 3 of our ‘Getting the Most Out of Your Microsoft 365 Licensing’ blog series. Look for a new installment every month. This blog series is intended for Small and Medium sized businesses (SMB) with Microsoft 365 E3/A3 or E5/A5 licensing to help you cut costs and maximize on the investments your organization has already made.
Within this five-part blog series we will be exploring:
- Building an Internal IT Helpdesk Request System
- Building a Change Management Request System
- Building an Asset Tracking System
- Track and Organize your Client/Vendor Listing
- Organize your Documentation Across Multiple Compliance Frameworks
Part 3: Building an IT Asset Tracking System
IT Asset Management (ITAM) should consist of hardware, software, and data, along with cloud-based assets such as Virtual Machines (VMs). Properly managing your IT assets during the deployment, usage, and disposal phases will help ensure assets are used efficiently and within budget. An established ITAM will provide improved performance, increased security, improved budgeting, asset visibility, and reporting.
We will be utilizing most of the same techniques as in Part 1 and 2 of this series, but the SharePoint List will allow for more detailed fields and Flow will be larger. In this blog we will be utilizing:
- SharePoint Online
- Power Automate Flow
- Power BI (Optional)
- Microsoft Teams (Optional)
Step 1: Create Your SharePoint List
If you do not already have a Change Approval SharePoint site (or equivalent), you will need to create one for your SharePoint list. In this example we’ll use the Information Technology site.
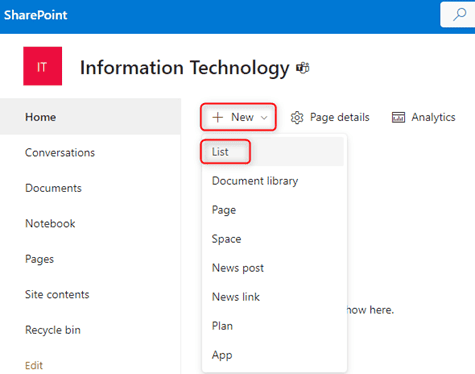
- Within your SharePoint site, select + New then select List.
- Select your Template. In this example we will be using the Blank template.
- Microsoft provides templates for several scenarios including Issue Tracking. In some scenarios those lists may include columns that aren’t pertinent to your organization.
- Give your list a distinct name and description, click Create.
- Now we will want to modify the list to suit our needs. Select the ⚙ in the upper right corner, select List settings.
- Add/Modify the columns to match your design.
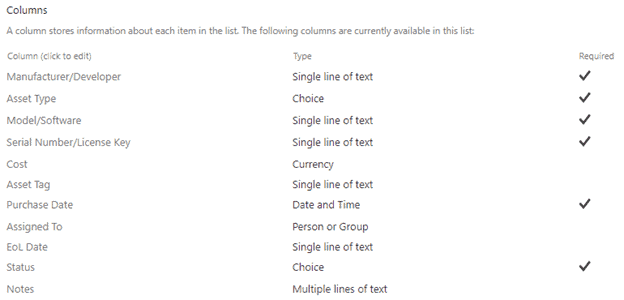
The above example is a very basic list and can be customized and built out based on organizational needs. There are several things that you can do to customize and meet the majority of small and medium organizational needs.
- Renamed the required “Title” column to “Manufacturer/Developer” to show who the hardware manufacturer or software developer is.
- Created the required “Asset Type” column as a choice column to choose between Server, Desktop, Laptop, Printer, Software, etc.
- Created the required “Model/Software” column will allow single-line text to contain the hardware model or software name.
- Created the required “Serial Number/License Key” as a single-line text column to track Serial Numbers (SNs) and License Keys.
- Created the “Cost” currency column to help track budget forecasting.
- Created the optional “Asset Tag” column to allow for single-line text to track asset tag numbers if utilized.
- Created the required “Purchased Date” column as a date/time column using the standard date only format to allow for full lifecycle tracking.
- Created the optional “Assigned To” person/group column, to track the asset assignment for easy identification. I am allowing multiple selections of people and groups.
- For example, my Office365 E3 license is assigned to an Admin Staff group, but my Office365 E5 is assigned to my Executive Staff group. Best Practice is to utilize group-based licensing for easy management. This is best done using dynamic groups in Microsoft Entra ID.
- Created the “EoL Date” as a Date and Time column using Date Only standard format. This column will be used on a weekly scheduled Power Automate Flow to create an End of Lifecycle (EoL) based on organizational lifecycles.
- You can use SharePoint calculated columns for this type of column instead of Power Automate if you have a standardized lifecycle. In this example we will be using Power Automate because we have different lifecycles per asset type, the Microsoft Licensing will be done on a 1 year, Servers/Desktops will be a 5 year and Laptops will be a 3 year.
- Created the required “Status” choice column that will allow tracking the lifecycle status with choices of active, inactive, and recycled/destroyed. This is useful to help track any legacy hardware/software instead of deleting the line items.
- For example, you wipe and recycle your equipment then get a query about a device SN that was found and need to track its lifecycle.
- Created the “Notes” multi-line text column to allow for entering and updating any specific information.
- For example, your organization consists of 1,500 employees, and you have a yearly Enterprise subscription to cover all employees. The notes can help you keep notes of any true ups to employee licensing numbers, costs fluctuations over the years so you have a true picture of costs and usage.
With this design, I expect to be able to regularly see what assets are coming up for renewal/refresh and can forecast IT business costs.
Customize Your View (Optional)
Within your SharePoint List select the All Items drop down and select Create new view or use List Settings, we will be using the List Settings to create view filters.
- Select the ⚙ in upper right corner, select List Settings.
- In this example, I want to create some useful views.
- “All Active” this view will display all active assets by setting a filter if status is equal to active. I will set this view as the default.
- “Active Servers” this view will only display active servers by setting a filter if status is equal to active and asset type is equal to server.
- “Active Systems” this view will display active laptops and desktops by setting a filter if status is equal to active and asset type is equal to laptop or desktop.
- “Active Software” this view will display all active software by setting a filter if status is equal to active and asset type is equal to software.
- “Quarterly EoL” this view will display items with an EoL within the next 90 days by setting a filter for EoL is less than [Today]+90 and status is equal to active.
- “No EoL” this view will display items that do not have an EoL for one-time purchases, etc. by setting EoL Date is equal to blank selection (empty selection box) and status is equal to active.
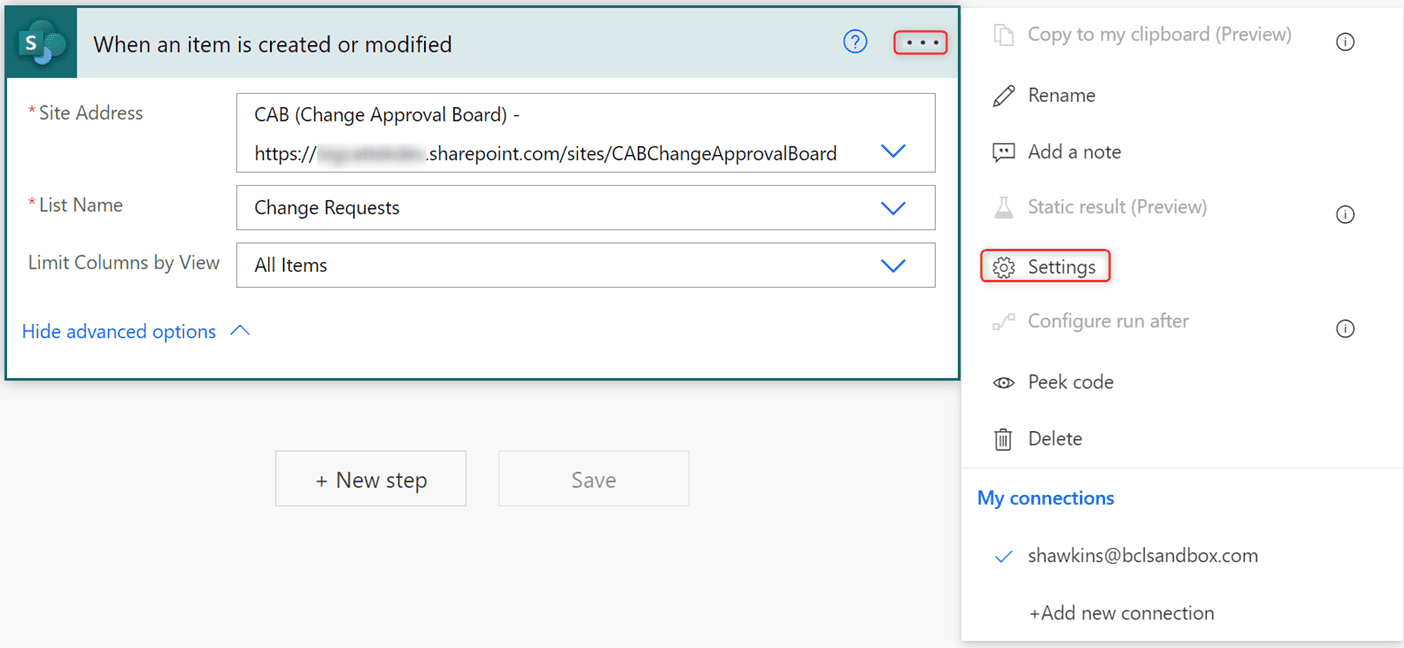
Step 2: Create Your Power Automate Flows
As first suggested in Part 1, when first getting started Power Automate and any Power Platform App will direct you to the “Default” Power Platform Environment for your tenant. It is highly recommended to leave the default a clean slate environment and create a new production environment. In some cases you may have the 1GB capacity limit that will not allow you to create a new environment. If possible, further lock down your environment so users cannot misuse production.
Currently, Flow does not support Service Principles or Managed Identities. You can use a Service Account, which will require access and licensing for all connectors you use. Alternatively, it is recommended to share your flow with additional staff and give them a co-owner rights as a backup. Verify there is a Change Management Approval in place for any modifications to Flows within your production environment.
First, open Power Automate. Power Automate can be found via the Office Portal, select All Apps if it is not on your menu. Select the correct “Environment.”
For this example, we will be creating a scheduled cloud flow that will run daily at 3am. This will allow us to update the purchase date of existing subscriptions, etc. without creating new line items on a monthly/yearly renewal. so there’s no need to rely on the “When a new item is created” automated flow.
Because this flow will be larger than the others, I recommend utilizing renaming and notes on larger flows. The renaming alone will help to easily identify the correct dynamic content when repeated steps are used within conditions. We will be limiting our query by using a null EoL Date ODATA filter. If you find you are tracking assets that do not have an EoL and your listing is getting close to the 5000 limit, you may want to create a special asset type and use an AND OData Filter to exclude those items in the “Get items” SharePoint action. Additionally, if your ITAM is larger and contains dozens of columns being tracked, you may want to create a view with only the columns needed and use the “Limit Columns by View” advanced option.
- Click +Create.
- Select Scheduled cloud flow.
- I will create a “IT Asset EoL” to be scheduled daily at 3am. Click Create.
- Click +New step.
- Select the Get items SharePoint action.
- Using dynamic content select your “Site Address” and “List Name”.
- Click the Show advanced options
- Enter EoL_x0020_Date eq null in the “Filter Query” field.
- Enter 5000 in the “Top Count” field.
- Click +New step.
- Select the Compose data operation. This will create an “Apply to each” array.
- Using dynamic content select “Purchase Date” as your compose inputs. Rename action. (Example: Purchase Date)
- Click +New step.
- Select Condition Control
- Using dynamic content select Asset Type Value is equal to Server.
- Click +Add then select Add row and make it an Or.
- Using dynamic content select Asset Type Value dynamic content is equal to Desktop.
- Rename the condition control to a unique value. (Example: Servers Desktops. Flow is limited to special characters; you can utilize – and _ symbols, but &, /, <, >, etc. are not supported.).
- In the “If yes” section, click Add an action then add a Compose action, rename the action. (Example: Calculate Server Desktop EoL)
- Enter addToTime(outputs(‘Purchase_Date’),5, ‘Year’) as the expression.
- Click Add an action then add Update Item SharePoint action and rename to a unique name. (Example: Update Server Desktop EoL)
- Use dynamic content to select your site, list and all the required columns, scroll down to the “EoL Date” field and add the Outputs from the Calculate Server Desktop EoL compose expression.
- In the “If no” section, click Add an action, select Condition Control action, rename action. (Example: Laptops)
- This will insert additional if yes and if no controls within the if no “Servers Desktops” control.
- Using dynamic content select Asset Type Value is equal to Laptop.
- In the “If yes” section, click Add an action then add a Compose action, rename the action. (Example: Calculate Laptop EoL)
- Enter addToTime(outputs(‘Purchase_Date’),3, ‘Year’) as an expression.
- Click Add an action then add Update Item SharePoint action and rename to a unique name. (Example: Update Laptop EoL)
- Use dynamic content to select your site, list and all the required columns, scroll down to the “EoL Date” field and add the Outputs from the Calculate Laptop EoL compose expression.
- In the “If no” section, click Add an action, select Condition Control action, rename action. (Example: Yearly Subscriptions)
- This will insert additional if yes and if no controls within the if no “Laptops” control.
- Using dynamic content select Asset Type Value is equal to Software.
- Click +Add then select Add row.
- Using dynamic content select Serial Number/License Key contains Subscription.
- Click +Add then select Add row.
- Using dynamic content select Notes and contains Yearly.
- Rename the condition control to a unique value. (Example: Yearly Subscriptions).
- In the “If yes” section, click Add an action then add a Compose action, rename the action. (Example: Calculate Yearly Subscription EoL)
- Enter addToTime(outputs(‘Purchase_Date’),1, ‘Year’) as an expression.
- Click Add an action then add Update Item SharePoint action and rename to a unique name. (Example: Update Yearly Subscription EoL)
- Use dynamic content to select your site, list and all the required columns, scroll down to the “EoL Date” field and add the Outputs from the Calculate Yearly Subscription EoL compose expression.
This is just a simple example of setting an EoL for servers, desktops, laptops and software. Additional EoLs for other assets can be set, such as cellphones, printers, scanners, and monthly subscriptions like QuickBooks Online, etc. The AddToTime expression used in our example can be used for Seconds, Minutes, Hours, Days, Weeks, Months and Years.
Step 3: Power BI Report (Optional)
If Power BI is available within your licensing, here’s an optional step.
You can create a data-rich reports to share with Finance or other interested parties needing to know upcoming costs, etc. These reports can be customized to your organizational needs. For this example, we will just be using the basic report. You can create multiple reports from the same list to share with different teams based on the data they need to visualize.
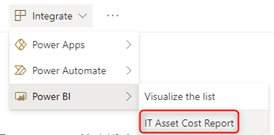
- Within the SharePoint list we can now create a Power BI report by clicking Integrate.
- Select Power BI.
- Select Visualize the list.
- Click Edit to customize the list to your needs.
- You will get a “Switch to edit mode” message, click Continue.
- Edit your view, you can also edit the mobile version, by clicking the mobile phone at the bottom left of the screen.
- When you are done editing click the Save button in upper right corner or drop down the “File” options in upper left corner.
- You will need to give your report a distinct name (Example: IT Asset Cost Report).
- Please note in the information box that anyone with access to the list will also have access to the report.
- If you share the report to other teams, they will also need to have read access to the data.
- Click Publish.
- The report will now be published in the SharePoint list and accessible within the Integrate, Power BI options.
Step 4: Share and Post the List (Optional)
Embedding Power BI reports into Websites and SharePoint sites is possible if appropriate capacity licensing is available.
For this example, we will just be using an embedded web link to illustrate available options to fit within different licensing models.
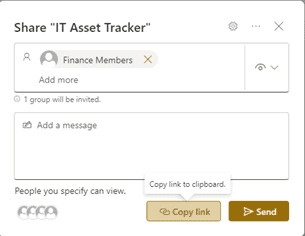
- I want to allow all Finance staff to view the list.
- Within the SharePoint List, select the “Share.”
- Select the ⚙ in the upper right corner.
- Select “People you choose” “Can view” and select “Apply”.
- In this example I will share with the “Finance Members.” I select the group and select “Copy Link.” Close the Share options.
- Within the “Finance” SharePoint site, I will be creating a new Site Page.
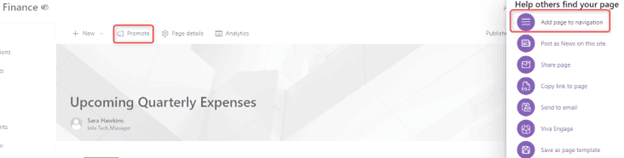
- You have different options like a Quick Link, a Web Part, etc. In this example I will create a new Site Page called “Upcoming Quarterly Expenses,” and embedding a URL using the “Quarterly EoL” view that we created in Step 1 by copying the URL from the view within the SharePoint list.
- This option could also allow embedding different quarterly costs from different teams, giving the Finance department one site page for all quarterly costs.
- Publish your page.
- I will also use the Promote option then Add page to navigation option to allow for easy navigation.
- You have different options like a Quick Link, a Web Part, etc. In this example I will create a new Site Page called “Upcoming Quarterly Expenses,” and embedding a URL using the “Quarterly EoL” view that we created in Step 1 by copying the URL from the view within the SharePoint list.
Step 5: Pin SharePoint List to Teams (Optional)
To easily access the IT Asset Tracker to be reviewed by IT and managed by IT Procurement, we will pin the list to the Information Technology General Channel. Most staff stay logged into Teams throughout the day, so they have one application to manage the assets.
- Select the + to add a new Tab to the Information Technology General Channel.
- Pin the “IT Asset Tracker” List to the team.
- Select the location and the list you want to add.
- The default view will display.
Step 5: Putting It Together
- IT, Administrative, and Finance staff can track and update assets for their entire lifecycle.
- IT management and Finance can forecast expenses and budgets based on yearly purchasing costs.
- You can give specific teams access to just the data they need by building customized views and publishing to their sites.
Final Thoughts
The above is just one example of how to build an ITAM system and how you can use different licensing models to suit your organizational needs. Using tools you already invest in, you can build a strong Information Security Management System (ISMS).
Does your organization need assistance with planning and deploying Microsoft 365 capabilities?
We will be happy to discuss the details with you. Contact Us.